What you'll learn
- Typically fits: Urban and major-corridor travel where gates show the contactless “Tap to ride” reader and international Visa/Mastercard networks are accepte
- Core limits: Open-loop tapping is not universal across every line, gate model, or fare product. Commuter passes, some private railways, and rural station
- Proof that usually matters: Look for the dedicated contactless reader and card-brand marks (Visa, Mastercard, JCB, and others on the sticker). If the reader is absent,
- Usually the wrong lane if: You want one rail to cover every Japan trip, need commuter teiki logic, or dislike post-pay / delayed-charge models on bank cards. In those
Key points
Two actions this week: ① Pick your situation row ② Complete the next step before you open another guide. Parallel research without action burns calendar time.
\ Add Wise to Apple Pay before rush hour /
※Suica in Wallet rules vary—confirm on JR East / Wise help pages.
Best choice by situation — 3 branches only
On mobile, swipe the table horizontally.
| Your situation | Conclusion | Next step |
|---|---|---|
| iPhone + Wise card | Apple Pay transit | Wallet setup first |
| Physical Welcome Suica | IC card path | Suica guide |
| Open-loop only | Backup cash/IC | Wise guide |
Pick the row that matches you—then act this week.
Stop parallel-comparing ten options. Pick your row, then complete the next step this week.
10-second gate: Can you execute the next step with your current visa, budget, and connectivity plan? If not, fix that first.
If you already use Wise (formerly TransferWise) for multi-currency balances, one of the most satisfying upgrades in Japan is when your Apple Pay wallet finally behaves like a local commuter’s card—at least on the lines and gates that support contactless bank-card tapping (often labeled “Tap to ride” / タッチ決済 alongside the IC pad). In 2026, many Wise customers in Japan see a clear signal in Wallet that the Wise Card is Apple Pay–ready (the system notification often reads “Wise Card” が Apple Pay で利用可能になりました。), after which you can add the same card to other Apple devices and—where readers exist—tap through ticket gates with the same motion you use for shopping.
This guide is written for one reader profile: a digital nomad visiting Japan who wants a clean mental model of Wise + Apple Pay at ticket gates, what the hardware looks like, where it tends to work, and where a physical IC card (Suica / PASMO) still wins. It pairs with the broader money stack in Wise for digital nomads in Japan and the transit primer Welcome Suica.
Disclosure: Transit acceptance, fare rules, and Wise product availability change. Always confirm on-operator pages and in the Wise app for your country of residence before you rely on a single payment method. Outbound Wise links may be affiliate.
What “Tap to ride” looks like on a modern Japanese ticket gate
Classic JR gates pair a yellow ticket slot with a blue circular IC reader (Suica / PASMO / interoperable IC). Newer installations add a black contactless module with a hand-and-card icon, the universal contactless symbol, and bilingual “タッチ決済 / Tap to ride” labeling. That module is the piece that accepts eligible credit and debit taps—including, in many cases, a Wise card presented through Apple Pay on iPhone.
On the reader fascia you will often see a strip of network marks (Visa, Mastercard, JCB, American Express, and others). Those marks are your quick signal: if your Wise product maps to an accepted brand in Wallet, you are in the right conversation with the hardware.
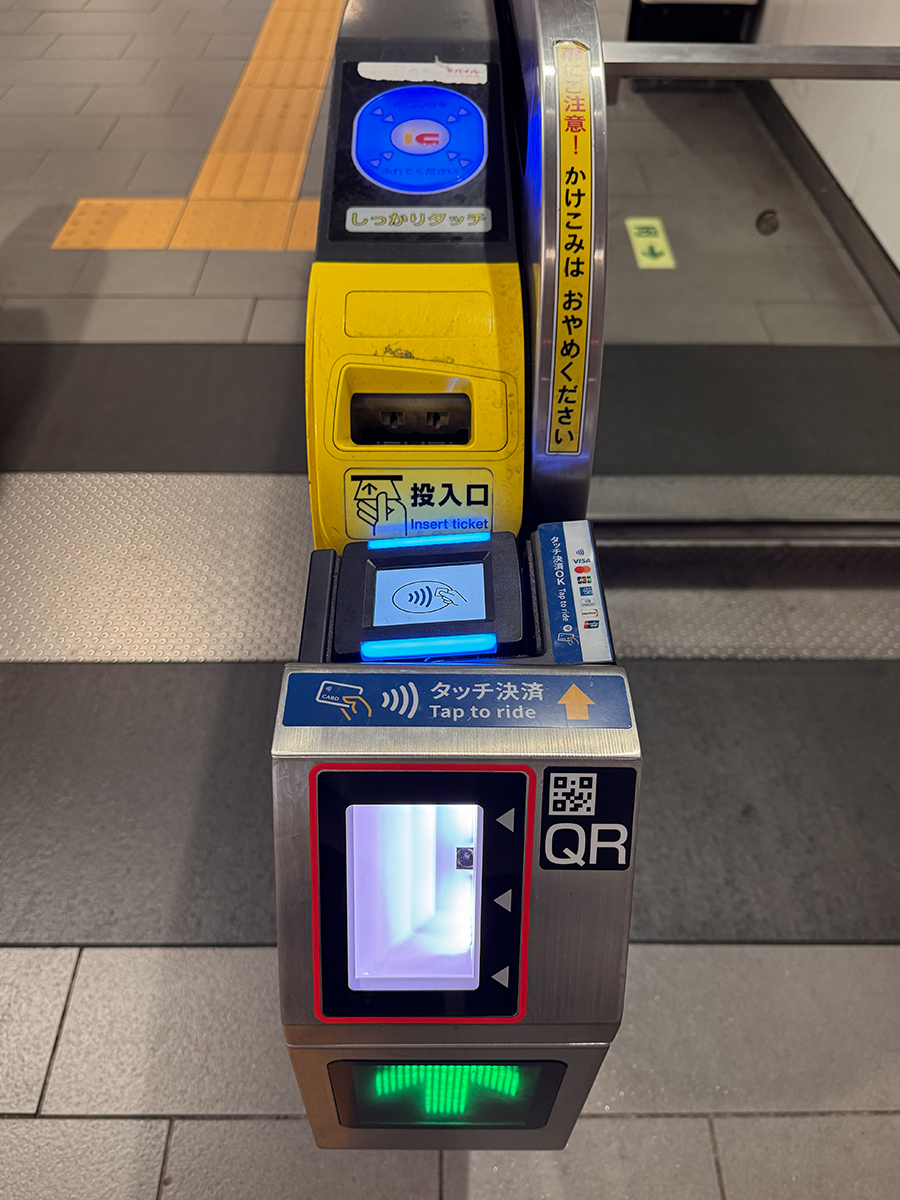
Figure 1 — Gate layout (top-down). The circular IC pad serves Suica-style cards. The separate Tap to ride module is where international contactless cards and Apple Pay often enter the flow. QR readers may sit nearby for app tickets—do not confuse the tap zones when you are in a hurry.
Wallet proof: Wise Card becomes usable on Apple Pay
After you complete Wise’s in-app steps to add a card to Apple Wallet, iOS may surface a push-style banner inside Wallet confirming availability. In the capture below, the copy matches what many Japanese-region accounts see: the quoted product name followed by が Apple Pay で利用可能になりました。 That string is useful evidence for your own notes (and for finance admins) that the token is live—before you walk to a gate.
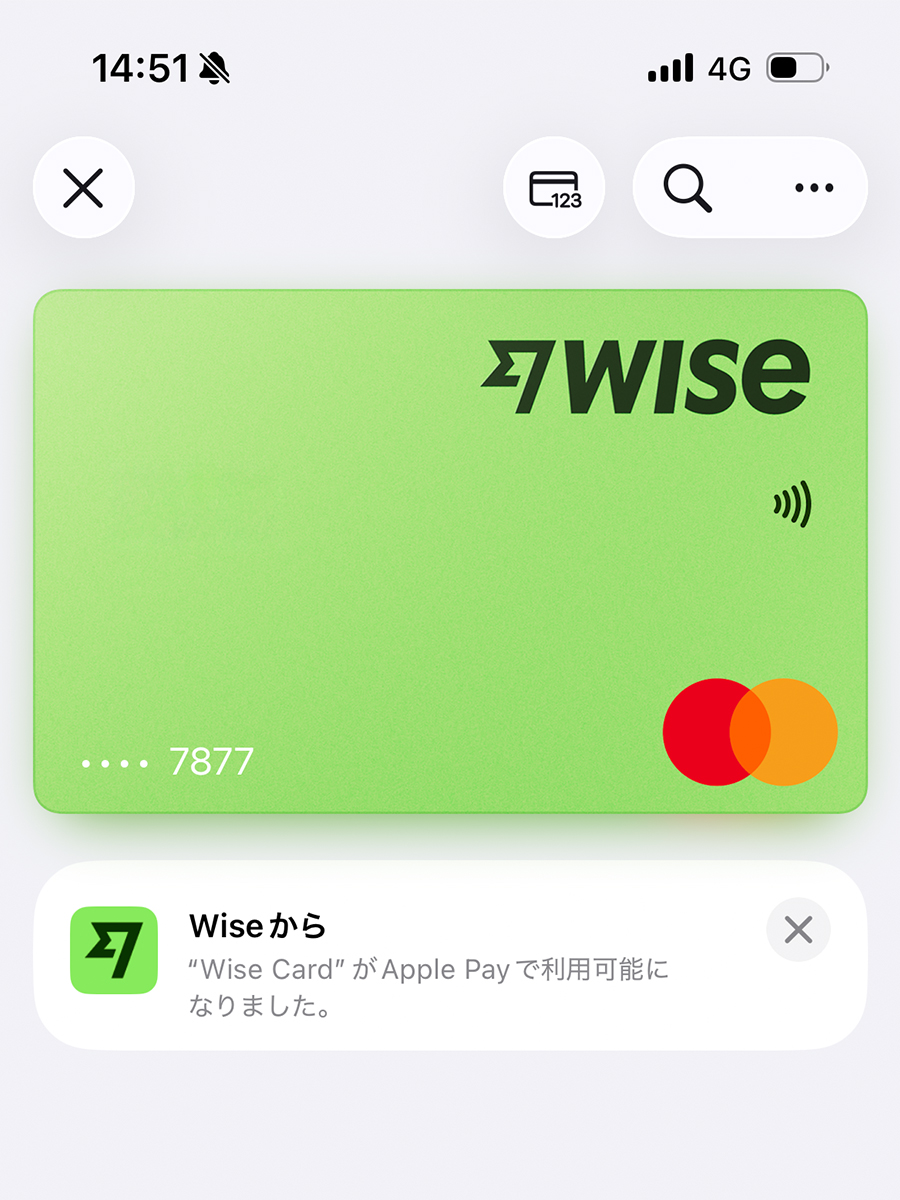
Figure 2 — Apple Pay readiness in Wallet. The lime Wise card surface (Mastercard co-brand in this profile) sits above Wise’s confirmation line in Japanese. Your exact wording may differ slightly by iOS language, region, and card product—compare against what your own Wallet shows after enrollment.
Adding Wise to your other Apple devices
During the same enrollment flow, Apple often offers ほかのデバイスに追加 (“Add to other devices”). In the session captured here, the Wise card could be pushed to a MacBook Air and an iPad in one pass, while an Apple Watch row appeared under 使用できません (“Cannot be used”)—a reminder that watch compatibility is not automatic for every issuer profile. If you rely on Watch-only commuting elsewhere, do not assume parity until Wallet explicitly lists the device class as supported.

Figure 3 — Multi-device enrollment. A MacBook Air and an iPad were selected for provisioning in one step; an Apple Watch row stayed under 使用できません in this profile. Treat the list as device-specific truth for your card at enrollment time, not a universal rule for all Wise products.
Field notes: tapping through at the gate with Wise in Apple Wallet
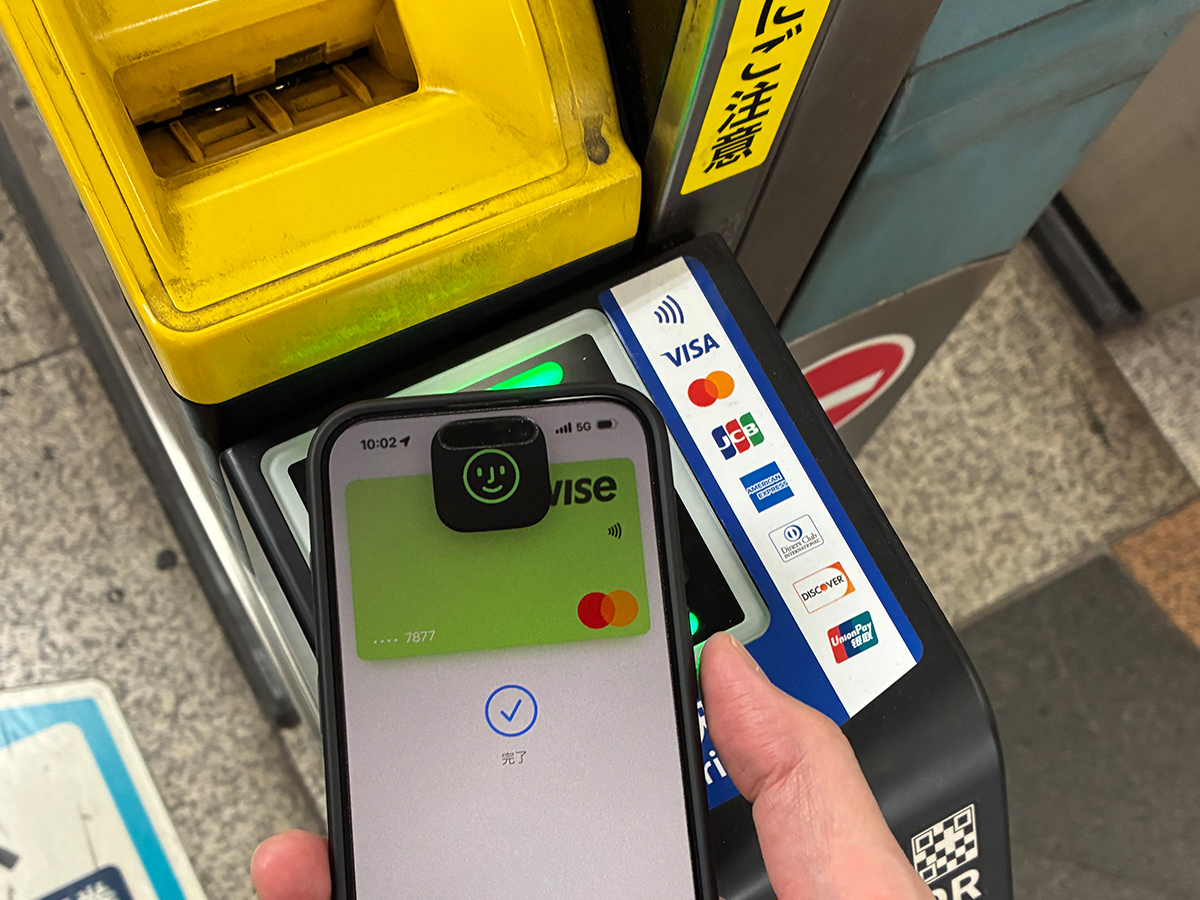
The capture below is from normal station use: an iPhone in a case, Apple Wallet open on the active Wise card, presented to the gate’s Tap to ride reader. The UI shows 完了 (“Done”) after a successful tap in this session—but your device, OS build, issuer risk checks, and gate firmware can still produce edge cases, so treat the sequence as documentation of what is possible on supported hardware, not a guarantee for every wicket.
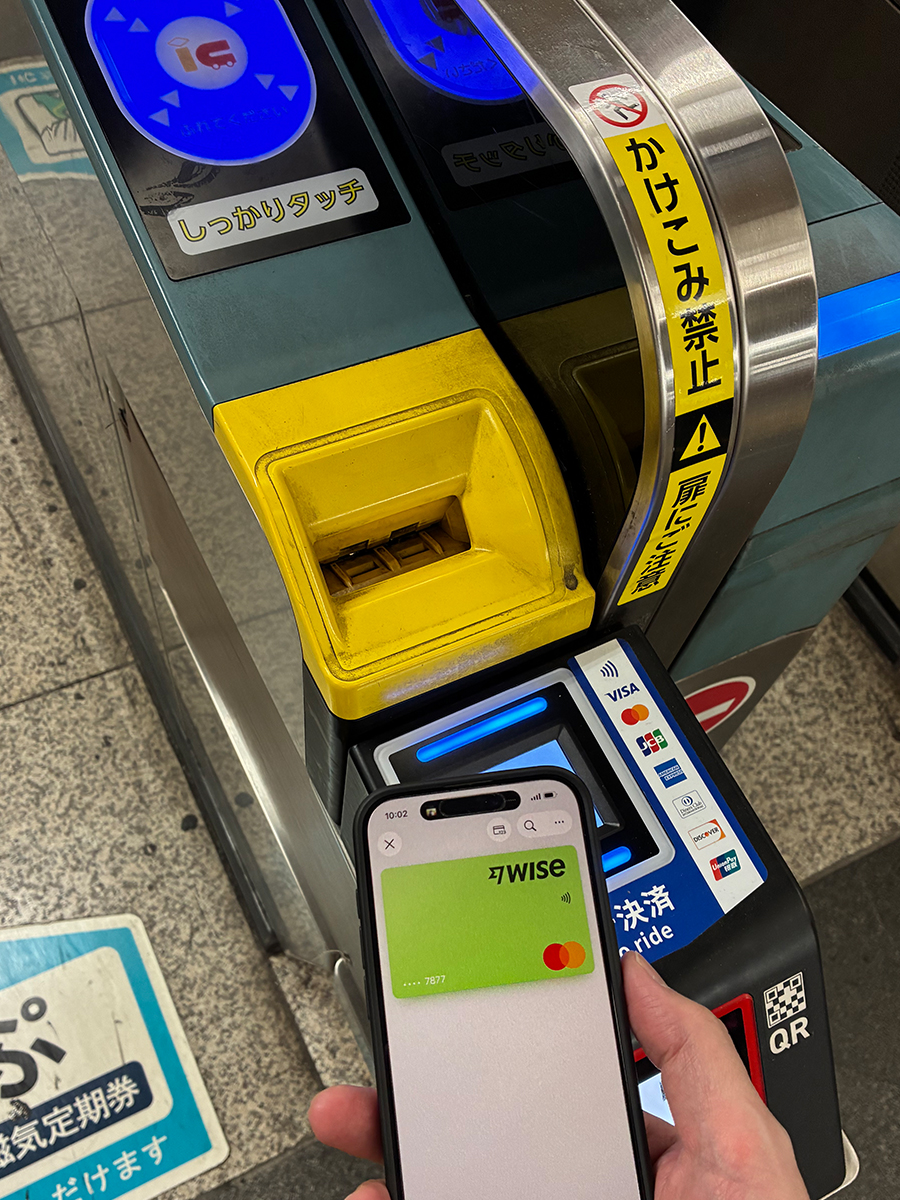
Figure 4 — Successful Tap to ride completion. The reader fascia shows タッチ決済OK / Tap to ride with international network marks; the phone confirms completion. Align the top edge of the phone (where the NFC coil typically sits) with the reader’s printed hand icon—rushing the angle is a common cause of double-taps.
How this fits next to Suica and “the IC lifestyle”
IC cards remain the default social technology for most residents: commuter passes, auto-fare adjustment within IC regions, and predictable beep-in-beep-out muscle memory. Welcome Suica (visitor-oriented) still fits many short chapters—see Welcome Suica for digital nomads in Japan for the 28-day reality and top-up constraints.
Wise + Apple Pay shines when you want one less plastic card in your pocket, you already fund Wise in your income currencies, and your daily movement stays inside routes that advertise bank-card tap. It is often less about “replacing Suica” and more about reducing cognitive load for the slice of trips where the reader is present and the fare model matches your risk tolerance.
On small screens, scroll horizontally to read all columns.
| Topic | IC (Suica / PASMO) | Tap to ride + Apple Pay (Wise) |
|---|---|---|
| Hardware cue | Blue IC pad; “touch firmly” prompts. | Separate contactless module; card network logos. |
| Typical strength | Broad compatibility; commuter pass products; resident rhythm. | No separate IC purchase for some urban taps; ties to Wise balances. |
| Typical weakness | Visitor cards may be time-limited; cash top-up on some products. | Not every line; bank declines; post-pay timing differs from IC. |
| Nomad heuristic | Keep funded IC as baseline. | Add when you confirmed reader + Wise eligibility on your route. |
Setup path: Wise card → Apple Wallet → first station tap
At a high level: order or access your Wise debit card, complete any required activation steps in the Wise app, then Add to Apple Wallet on iPhone. Figures 2–4 in this article walk the same real-world sequence—availability banner in Japanese, optional provisioning to Mac/iPad, and a successful 完了 read at a Tap to ride gate. Choose the card product that matches the network you expect at transit readers. After the card appears in Wallet, pick a low-stakes station (wide gate, off-peak) for the first tap so you can re-try calmly if the gate asks for staff assistance.
If Express Transit–style behavior is available for your card product, configure it once in a quiet café—not while a tour group is behind you at the wicket. Apple’s own Wallet documentation changes by iOS generation; follow the current screen flow rather than memorizing button names from an older guide.
Where people misunderstand the stack
- Assuming IC coverage equals bank-tap coverage. They are parallel systems on many gates. Look for both zones.
- Treating Apple Pay as “always faster.” Face ID failures and double-taps happen. IC is sometimes fewer seconds.
- Ignoring fare post-processing. Bank-card transit may appear on statements differently from IC history—keep a weekly reconciliation habit if you expense travel.
- Reading the Japanese Wallet banner as “Suica is obsolete.” The Apple Pay–ready line confirms tokenization on Apple devices—not every private line, pass product, or gate model.
- Skipping the full Wise guide. ATMs, hotels, and online bookings still matter; return to Wise for digital nomads in Japan for the whole wallet picture.
Important
Immigration status, tax residency, and permitted activities in Japan are unrelated to which card you tap at a gate. If you are on a specific visa category, follow MOFA / immigration guidance—not a payments article. For the six-month digital nomad route overview, see Japan digital nomad visa.
Cost-of-trip framing
If you are budgeting a longer Tokyo or multi-city arc, bank the cost of living in Japan for digital nomads baseline first. Tap-to-ride changes friction more than it changes rent; the win is fewer broken flows on moving days, not a magically cheaper apartment.
Your planning week: execution order
Remote workers lose the most time in the gap between "I researched Japan" and "I booked one base." Treat this page as a decision tool—not a bookmark graveyard. The goal is one completed action per week until arrival.
Monday — confirm your row
Pick the situation table row that matches your visa, budget, and trip length. If two rows feel equally true, choose the more conservative one: shorter stay, higher insurance proof, clearer connectivity. Write your row in one sentence at the top of your notes app.
Tuesday — kill parallel tabs
Shortlist two options maximum for whatever this article covers (stay, eSIM, policy, or money rail). Open official pricing or checkout pages—not ten comparison blogs. Parallel research without a decision date burns calendar time and peak-season inventory.
Wednesday — run the checklist
Work through the Japan Setup Checklist 2026 in order. Steps 1–3 (SIM, insurance, money) protect week one. Do not skip them because hotel photos are more fun to browse.
Thursday — validate connectivity
If client calls matter, confirm backup internet before you rely on hotel Wi-Fi alone. Read eSIM vs pocket WiFi and install or order before departure when possible.
Friday — book or buy one thing
Complete one non-refundable-safe action: hold a flexible stay, buy an eSIM test plan, or purchase insurance that matches your certificate needs. Momentum beats perfection.
Iron rule before you close this tab
Reading ten more guides without booking, insuring, or connecting is how remote workers lose peak inventory and client trust in the same month. Pick your row, run the checklist, and act this week.
Hub: Digital nomad in Japan — complete guide · Fit: Is Japan good for digital nomads? · Visa: Digital nomad visa Japan
Express lane | Next step
Shortest path before you land
SIM: Airalo Japan review · Insurance: SafetyWing guide · Money: Wise card for Japan
Then run the Japan Setup Checklist 2026 (10 steps).
Complete SIM and insurance before you optimize hotel amenities—arrival week is too late for preventable setup debt.
Works well
- Clear next step after one table row
- Links to deeper Japan DN guides
- Action-first structure for remote workers
Common failures
- Endless research without booking or setup
- Ignoring visa or insurance wording
- No backup internet before client calls
Connectivity note
Your internet plan is part of accommodation quality—not a separate decision. Use primary Wi-Fi, secondary eSIM/SIM, and one emergency workspace option.
On arrival day, tether once from your phone to confirm backup works before you need it for a client call.
Compare: eSIM vs pocket WiFi · best unlimited WiFi
Pre-arrival checklist
Wise in Wallet
Wise card is added to Apple Wallet, not expired, shows the expected network (for example Mastercard where applicable), and you have seen the availability confirmation (often a Japanese line such as “Wise Card” が Apple Pay で利用可能になりました。).
Express Mode
You understand whether this card uses Express Transit settings on your iPhone—if unsure, open Apple’s Wallet help for your iOS version.
Reader check
Target gates display Tap to ride / contactless reader with card marks; you are not tapping only the legacy IC pad by mistake.
Backup rail
Physical IC or mobile Suica (if you use it) is funded; small yen cash for the segment where bank tap is unavailable.
Charges
You accept possible bank-side post authorizations and FX—read Wise’s Japan spend notes for your account currency.
Connectivity
Face ID / device unlock pattern works reliably; you are not debugging Wallet on 1% battery before airport express.
\ Test a low-value tap after card activation /
※Suica in Wallet rules vary—confirm on JR East / Wise help pages.
Why this works
One clear decision path beats ten parallel tabs. Act this week on the row that matches you—that is the operating rule.
Memo
Visa: digital nomad visa Japan · Setup: Digital Nomad Setup Japan · Hub: Complete Japan guide
Related articles
-

-
Wise Card for Digital Nomads in Japan (2026) — Pay in Yen, FX Basics & Limits
\ Price your next yen transfer on Wise / Open Wise account ※Fees and eligibility vary by country—con ...
続きを見る
-
-
Welcome Suica for Digital Nomads in Japan (2026) — IC Transit, Top‑Up Rules & Limits
\ Pair Suica with a reliable spend rail / Wise card for Japan ※JR East product rules change—confirm ...
続きを見る

-
-
Digital Nomad Setup Japan: The Complete Checklist (eSIM, Wi-Fi, Banking, Insurance, and Stay)
\ Run the checklist—then book your base / Read complete Japan guide ※Official visa and insurance rul ...
続きを見る

https://wanderwork.jp/nomad-finance/wise-card-digital-nomads-japan/
https://wanderwork.jp/transportation/welcome-suica-digital-nomads-japan/
https://wanderwork.jp/workation-city-guide/digital-nomad-setup-japan/
FAQ
Should I decide everything before booking?
No—lock the highest-risk items first (stay, connectivity, insurance), then refine with the setup checklist.
Where should I start if Japan is new to me?
Read Is Japan good for digital nomads?, then follow the express lane above.
Article summary
- Pick your situation row first—then act this week
- Layer internet: Wi-Fi + eSIM backup
- Run the Japan setup checklist before non-refundable bookings
Block 90 minutes this week to confirm your row, run the checklist, and complete one high-leverage action.
Wallet notifications are not proof of gate success. Open Wise, add the card to Apple Pay, and run a test tap before you depend on it Monday morning.
\ Transit taps fail when wallets are half-configured /
※Suica in Wallet rules vary—confirm on JR East / Wise help pages.
※This article is general information for foreign visitors planning remote work in Japan. It does not guarantee booking outcomes, visa status, or internet performance. Confirm listing details, cancellation terms, and official requirements before you pay. Affiliate links may earn commission at no extra cost to you.